Elaaden is an arid, burning desert, but Remnant technology could make conditions more livable for Milky Way species and the angara. The key to doing so is the vault, which can be unearthed by activating the Remnant monoliths scattered about the planet.
Acquisition
Starts the first time Pathfinder Ryder lands on Elaaden.
Note: It is not necessary to complete this mission in order to complete Settling Elaaden. Completing the objectives for that mission will push viability beyond the 40% threshold required. However, activating the vault early on will make it easier to complete the various missions on the planet as the hazard levels will be removed by activating the vault.
Walkthrough
Activate Elaaden's Monoliths (0/3)
Make This Dust Bowl Livable: Monolith 1
Head east-southeast of the Forward Station in the western Sea of Ataraxia region. This is the Western Monolith![]() .
.
Scan For Glyphs (0/3)
Scan the three glyphs on the top of the arms of the Remnant structure. Magnitude, Nihility, and Verdurous Glyphs. Use the small Remnant console on the platform near the main Remnant console to raise columns so that Ryder can jump up to the arms of the structure.
Activate The Monolith
Interact with the main Remnant console to activate the monolith.
Make This Dust Bowl Livable: Monolith 2
Head east of the Forward Station in the northeastern Sea of Ataraxia region. This is the Northeastern Monolith![]() .
.
Scan For Glyphs (0/3)
Scan the three glyphs on the top of the arms of the Remnant structure. Accretion, Hydrodynamic, Stratospheric Glyphs. Jump up to the arms of the structure to scan the glyphs.
Activate The Monolith
Interact with the main Remnant console and a puzzle will need to be solved to activate the monolith. Solve the puzzle (needed for the Cryptographer Achievement). For the puzzle console solution, see here.
Make This Dust Bowl Livable: Monolith 3
Head to the Paradise Sands region directly west of the Forward Station. This is the Southern Monolith![]() .
.
Scan For Glyphs (0/3)
Scan the three glyphs on top of the arms of the Remnant structure. Semiosis, Synaptic, and Zero Glyphs. Use the three small Remnant consoles on the platform near the main Remnant console to raise columns so that Ryder can jump up to the arms of the structure.
Activate The Monolith
Interact with the main Remnant console to activate the monolith.
Investigate The Vault's Entrance
Head to the vault in the Languish region (northeast of the Western Monolith).
The entrance will rise from the ground when Ryder approaches. Head down into the vault and take the gravity well down.
Activate Emergency Power
After Ryder lands in the room, the power needs to be restored. Activate the Remnant console on the upper ledge.
Behind a small wall on the upper ledge is a lootable container.
Scan the Adaptive Remnant Core Device (Red R) in the lower section for +100 ![]() .
.
Remove The Vault's Lockdown
To open the door the next room Ryder has to use the five consoles so that each of them sends a white beam to the door. Each console changes the setting of its own beam and the beams to the right and left of the console, wrapping around to the other side for the consoles on the extreme right and left. This might be a frustrating exercise, however in fact, most of the consoles are to be ignored. Facing the door, number the extreme left console (1), the next console (2), and so on until the extreme right console being (5).
Left (1) (2) (3) (4) (5) Right
To solve the puzzle and open the door, activate console (5), and then console (4). The door will then open into another room with a huge tree structure in the center.
Head into the tree room and Ryder will come under attack from three Assemblers. Defeat them.
In the center of next room, next to the tree, is the vault activation console. Scanning the console reveals it is currently locked down. Ryder will be able to use this console during the escape from the purification field.
The door to the west leads to a corridor where Ryder will have to fight an Assembler and a Nullifier.
Interacting with the Remnant console in this corridor will change the energy bubbles in this section from blue to red (leave the bubbles as blue). Certain energy bubbles will deplete Ryder's shields if touched or entered so avoid contact. Any dome that leaves a red circle on the ground will damage Ryder, any dome that leaves a blue colored circle on the ground will not harm Ryder. Bubbles can change when consoles are activated so pay attention.
Open the door at the end of the corridor into the next very large room. Ryder will come under attack from three Observers. Defeat them.
Ahead of Ryder on the lower platform, there is a long gap with two energy shields protecting the first rem-tech container. Jump down into the gap and approach the energy barrier. SAM will create a navpoint![]() of the location. Scanning the ground leads to the south and Ryder will comment about the path being blocked and that the abyss can't be crossed yet.
of the location. Scanning the ground leads to the south and Ryder will comment about the path being blocked and that the abyss can't be crossed yet.
- Opening The Path To The Purification Chamber
Head back up to the area with the energy shield, face the west, and interact with the two Remnant consoles that raise columns up from the depths. The left console (Red 1) raises columns on the left, the right console (Red 1) raises columns on the right.
Jump down to the west onto the central column. Turn around and face the east to find a small ledge that contains an Adaptive Remnant Core Device that Ryder can scan for +100 ![]() .
.
Jump up to the tallest column on the right and activate a Remnant console (Red 2). A beam of light will point down towards the central column.
Jump back down to the central column and jump up to the tallest column on the left and activate a Remnant Console (Red 3). A beam of light will point down towards the central column.
Jump back down to the central column and then back up to the initial Remnant consoles (Red 1). Activate the console on the left and the right and two more beams will point towards the central column. A new column to the west of the central column will rise up. Jump to the new column and activate the Remnant console (Red 4) to open the locked door.
Jump across to the platform with the newly opened door.
On the other side the door are three Assemblers and a turret. At the end of the curved corridor is a Remnant console (Red 5). Activate the console and two beams of light will be created. One beam causes columns to rise out of the depths that leading back to the energy barrier area. The other beam of light will unlock the door to the purification chamber.
Return to the central area with the energy barrier.
- Create The Bridge To The Purification Chamber
Jump down to the east to a small platform with a tree on it. The Remnant console (Red 6) can be used to turn the bubbles from blue to red and create Bridge 1 to the east. Using the console again will change the bubbles from red to blue and retract the bridge.
Cross over Bridge 1 and head to the right of Bridge 1. Jump up to the area with the Remnant Console (Red 7). There will be a Nullifier that needs to be defeated. Activate the console and this creates Bridge 2. Near the console hidden in the corner is an Adaptive Remnant Core Device that Ryder can scan for +100 ![]() .
.
Warning: A glitch can occur if Ryder falls off the pillars in this area. Ryder will respawn in the ND1 Nomad on the lower rock face. While hard, it is possible to exit the Nomad and jump back up the vine to the proper mission area.
- Puzzle Console, Remnant Data Core, and Second Rem-Tech Container Path
Head back to the Bridge 1 area.
Looking towards the east and on higher platforms are numerous Remnant enemies. There are Assemblers, Observers, and a Turret with the high ground. Ryder can engage the enemies from long distance or go around to the left to use the ramps leading up to the enemies to defeat them. Defeat the enemies.
Continue heading upwards. Halfway to the Remnant console (Red 9), Ryder can sidetrack to the west to an Adaptive Remnant Core Device up on the ledge to scan for +100 ![]() . This location is south of (Red 8) on the map.
. This location is south of (Red 8) on the map.
Continue back east and head upwards towards the Remnant console (Red 9). Ryder will come to an area with four energy bubbles and come under fire from a Destroyer and two Nullifiers. Destroy the enemies.
Activate the Remnant console (Red 9) to open the door.
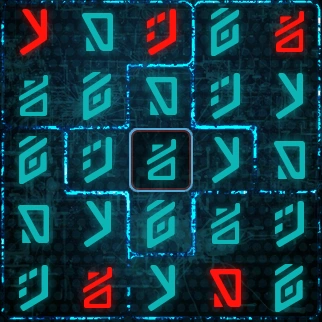
Inside the room on top of the column is a Puzzle Console in the center. Solve the puzzle (needed for the Cryptographer Achievement). Ryder receives 2 skill points. For the puzzle console solution, see here. Note: This puzzle can't be overridden with a Remnant Decryption Key and must be solved.
There also are seven smaller Remnant consoles of which two are retracted into the floor. The other five have to be activated in order so all five are retracted into the floor. If Ryder uses the wrong console, the consoles reset, and Ryder has to start again.
The key to the puzzle is that all but one of the consoles will have a rotating glowing square block appear behind it as Ryder approaches. Activate the one console WITHOUT a glowing block and it will retract. Head to the remaining consoles to find the console without a glowing block and activate that console. Keep doing this until all five have retracted.
When all of the consoles are retracted into the floor, the two additional consoles will rise. Using the two new consoles will open two areas:
- The eastern console removes a wall and leads to a room with a Remnant Data Core for Task: Remnant Data Cores. There are three Adaptive Remnant Core Devices that can be scanned for +300
 . There are also three glyphs (Accretion, Kinetic, and Thermodynamic Glyphs) and six data patterns on the walls that can be scanned but there is no known use for scanning these items.
 - The western console opens a door to an energy barrier and the path to the second rem-tech container that can be picked up during the escape from the purification field.
Once all of the items have been collected, head back down to the Bridge 1 area.
- Hidden Container
From the Bridge 1 area, jump up on the ledge to a Remnant console (Red 10) and activate the console. A tall column will rise from the fluid. Head back to the energy barrier container area at start of this room and jump down to the lower ledge to the east to access the Remnant Console (Red 11). Another column will rise from the fluid. Jump to the new column and then jump to the hidden container on the tallest column.
Head back down to the energy barrier area and then head to the purification chamber.
Inside the purification chamber are three Nullifiers. Defeat them.
Tip: If Ryder is attempting to collect both rem-tech containers, saving the game now would be an excellent strategy.
Activate the purification console. Note: Ryder will automatically be awarded the Fusion Mod of Rupture for activating the purification console.
Escape The Purification Field And Exit The Vault
If Ryder doesn't care about the second rem-tech container, take the path to the north, picking up the first rem-tech container on the way, and interact with the Activation Console to turn off the purification field.
If Ryder wants to grab both rem-tech containers, take the path to the north, quickly pick up the first rem-tech container, and then take the path to the east. Ryder needs to cut corners with every 10th of a second possible.
- Solution: After collecting the first rem-tech container, take a long jump down to the column, then one to the east platform. After crossing Bridge 1, take a jump or Ryder might get stuck at its end. Jump up on the ledge and continue up the ledges to the door at the Remnant Console (Red 9). When grabbing the second rem-tech container, do that from side of the container facing the Activation Console. Run to the activation console and turn off the purification field.
The mission ends once the purification field has been turned off.
Aftermath
The temperature on Elaaden has become noticeable lower and doesn't deplete Life Support anymore.
Rewards
- +1330 XP
- +900 AVP
- +40% Elaaden viability
Puzzle Solutions
- Main article: Remnant Decryption Puzzle Guide
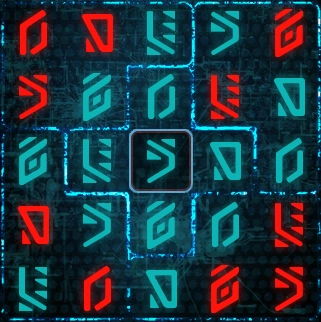 |
 |
| Northeastern Monolith Reward: Game Progression |
Vault Console Reward: Skill Points No Override |